Saturday, August 6, 2011

Microsoft Surface ScatterView

Scatter View is one of the most important controls of which Microsoft Surface SDK is providing and it enables features like multi usable, multi touchable, moving components here and there, stacking items, resizing, scaling and so on.
Throughout the discussion, we will cover,
1. How we can use Scatter View
2. Change Scatter View Properties
3. Adding Items to Scatter View Programmatically
4. Add Interactive Elements to Scatter View
5. Conclusion
Just start to get things going; let’s create a Microsoft Project in Visual Studio 2010,
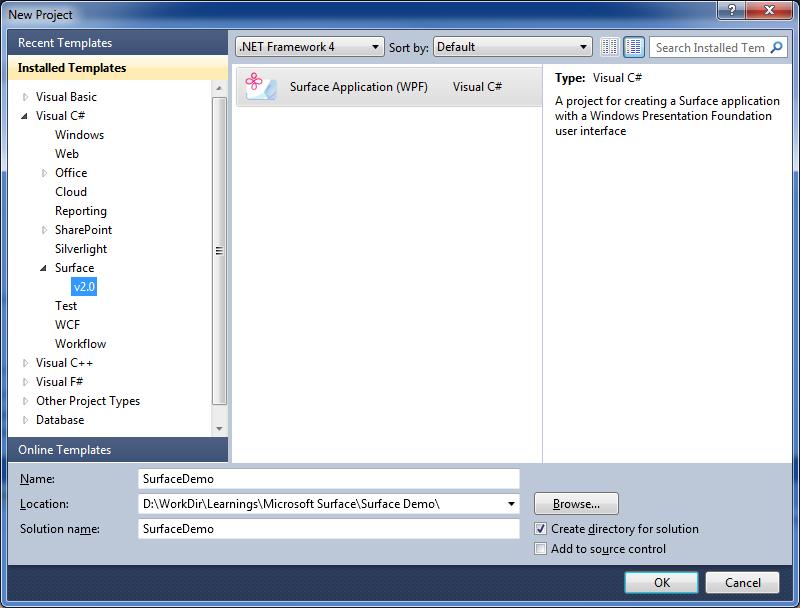
Press OK and then we will get a Project created in VS 2010 named, SurfaceDemo, which is having a Surface Window named “SurfaceWindow1”. This is the XAML we got in SurfaceWindow1.XAML page,
<s:SurfaceWindow x:Class="SurfaceDemo.SurfaceWindow1"
xmlns="http://schemas.microsoft.com/winfx/2006/xaml/presentation"
xmlns:x="http://schemas.microsoft.com/winfx/2006/xaml"
xmlns:s="http://schemas.microsoft.com/surface/2008"
Title="SurfaceDemo"
>
<Grid>

Grid>
s:SurfaceWindow>

Then I will go and add a Sactter View into the Grid inside the grid,
<s:SurfaceWindow x:Class="SurfaceDemo.SurfaceWindow1"
xmlns="http://schemas.microsoft.com/winfx/2006/xaml/presentation"
xmlns:x="http://schemas.microsoft.com/winfx/2006/xaml"
xmlns:s="http://schemas.microsoft.com/surface/2008"
Title="SurfaceDemo"
>
<Grid>
<s:ScatterView Name="MyScatterView">

s:ScatterView>
Grid>
s:SurfaceWindow>

How we can User the Scatter View

No we can start adding Controls into Scatter View. You can add any of Surface Control into this Scatter view and it will give those controls to the behaviors that I mentioned earlier. Let’s start the with an Image, that the perfect example we show most of the features of Scatter View. Instead of one image we will add the set of images from one of my image folders, and we are going to add the images at the run time too.
Here is the Scatter XAML code we need for our purpose, means how it’s look like the Scatter View SurfaceWindow1.xaml file,
<s:ScatterView Name="MyScatterView">
<s:ScatterView.ItemTemplate>
<DataTemplate >
<Image Source="{Binding}"/>
DataTemplate>
s:ScatterView.ItemTemplate>
s:ScatterView>

Then in the code behind file, we have to bind the list of image into Scatter View to show them in the window,
public SurfaceWindow1()
{
InitializeComponent();

// Add handlers for window availability events
AddWindowAvailabilityHandlers();

//Add Images into Sctter View
MyScatterView. ItemsSource = System.IO.Directory.GetFiles(@"D:\WorkDir\Learnings\Microsoft Surface\Photos", "*.jpg");
}

Here what we are doing is that, just adding my mages list into scatter view item source,

Here is how output is looks like after hitting F5,
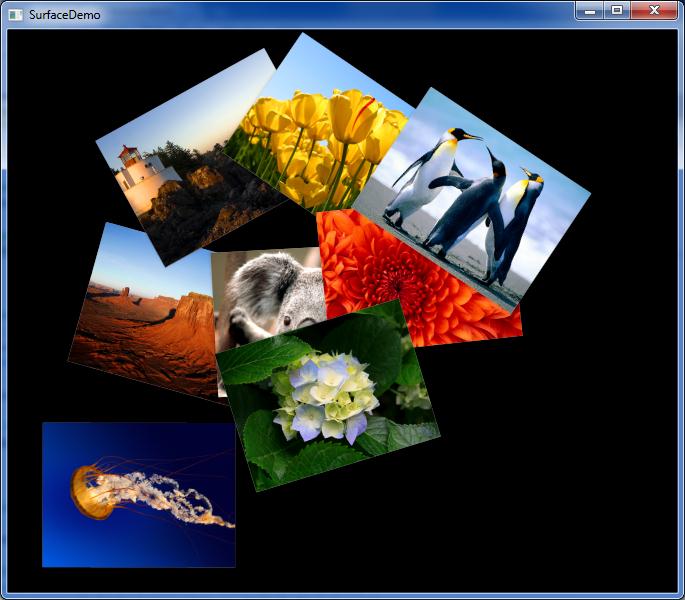

Now you can start playing with these images by using your mouse. You should be able to drag them here and there and change the angle the way you need and etc. But to test multi User and Multi Touch capabilities, you need to use the Windows 7 Input Simulator.

To Start the Input Simulator, just type input in “Run” command box, at the bottom of Windows Start Menu, then you will see the Input Simulator and just click on it.
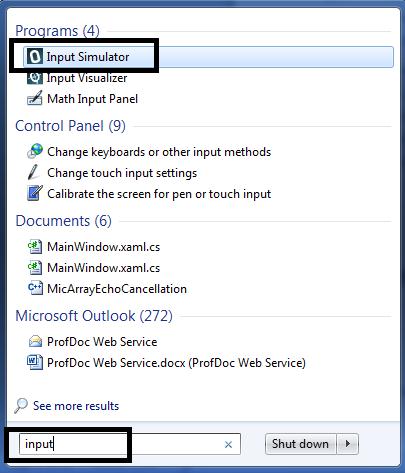


Input Simulator
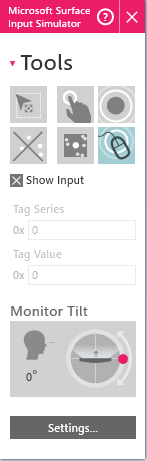

Just Click on the finger box in command window, then you will get your mouse pointer, which is most like a vertical rectangle, which is having curved edges. First Just click images with it, then you will see the reflections from the images. To play with the image, first click Left mouse button and while it is pressed, just click the right mouse button too, then you will get a fix clicked, like pined point in picture.

Then just go to other corner of the image, click left mouse button and while it is pressed start to move mouse around the window. Now you will find your ways to play with images. With this you should be able to Scale and Rotate the images easily with your mouse.

Change Scatter View Properties

When it’s come to changing properties of Scatter View items, you can,

1. Constraining Manipulations
2. Limiting manipulations
3. Setting Explicit Positions

You can constrain Scatter View Item manipulations by setting,

1. MaxHeight – this is the maximum height of items
2. MaxWidth – this the maximum width of the items
3. MinHeight - minimum height of the items
4. MinWidth – minimum with of the items
5. CanScale – true means can scale items, false means can’t scale items
6. CanRotate - true means can rotate items, false means can’t rotate items
7. CanMove - true means can move items, false means can’t move items

<s:ScatterView Name="MyScatterView">
<s:ScatterViewItem MaxHeight="100" MaxWidth="100" MinHeight="50" MinWidth="50"
CanScale="True" CanRotate="True" CanMove="False">
<Image Source="D:\WorkDir\Learnings\Microsoft Surface\Photos\Koala.jpg" />
s:ScatterViewItem>
s:ScatterView>

There are many numbers of properties; you can change in Scatter view and Scatter view items to make things more usable for your customers. Here I just mentioned few key properties only.

This is a sample Scatter View,

<s:ScatterView Name="MyScatterView">
<s:ScatterViewItem Center="512,384" BorderBrush="Brown" BorderThickness="3">
<Image Source="D:\WorkDir\Learnings\Microsoft Surface\Photos\Desert.jpg"/>
s:ScatterViewItem>
<s:ScatterViewItem Center="512,384" BorderBrush="Brown" BorderThickness="3">
<Image Source="D:\WorkDir\Learnings\Microsoft Surface\Photos\Desert.jpg"/>
s:ScatterViewItem>
<s:ScatterViewItem Center="512,384" BorderBrush="Brown" BorderThickness="3">
<Image Source="D:\WorkDir\Learnings\Microsoft Surface\Photos\Desert.jpg"/>
s:ScatterViewItem>
<s:ScatterViewItem Center="512,384" BorderBrush="Brown" BorderThickness="3">
<Image Source="D:\WorkDir\Learnings\Microsoft Surface\Photos\Desert.jpg"/>
s:ScatterViewItem>
<s:ScatterViewItem Center="512,384" BorderBrush="Brown" BorderThickness="3">
<Image Source="D:\WorkDir\Learnings\Microsoft Surface\Photos\Desert.jpg"/>
s:ScatterViewItem>

<s:ScatterViewItem Center="512,384" BorderBrush="Brown" BorderThickness="3">
<Image Source="D:\WorkDir\Learnings\Microsoft Surface\Photos\Desert.jpg"/>
s:ScatterViewItem>
s:ScatterView>

And output is like this,

You can use ItemContainerStyle property to change the properties of Scatter View Container Items,

<s:ScatterView>
<s:ScatterView.ItemContainerStyle>
<Style TargetType="{x:Type s:ScatterViewItem}">
<Setter Property="Center" Value="512,384"/>
<Setter Property="BorderBrush" Value="White"/>
<Setter Property="BorderThickness" Value="3"/>
Style>
s:ScatterView.ItemContainerStyle>
<Image Source="Desert.jpg"/>

<Image Source="Desert.jpg"/>
s:ScatterView>

Add Items to Scatter View Programmatically

Instead of doing things with Scatter View in XAML, developers can do the same, more dynamically by programming. You have access to all the properties of Scatter View, in programmatically, as you do in XAML, in statically. Whatever you do in XAML will reflect in output in static way, but whenever you need things to be more dynamic, then the option is obvious, you have to do it in programmatically.

For an Example you can take photo application I created at the first phase of the article, there we take the images from folder and populate them in Scatter View, as Scatter View Items, dynamically.

XAML
<s:ScatterView Name="MyScatterView">
<s:ScatterView.ItemTemplate>
<DataTemplate >
<Image Source="{Binding}"/>
DataTemplate>
s:ScatterView.ItemTemplate>
s:ScatterView>

public SurfaceWindow1()
{
InitializeComponent();

// Add handlers for window availability events
AddWindowAvailabilityHandlers();

//Add Images into Sctter View
MyScatterView. ItemsSource = System.IO.Directory.GetFiles(@"D:\WorkDir\Learnings\Microsoft Surface\Photos", "*.jpg");
}


Add Interactive Items to Scatter View

As WPF Panels, Grids and any other container controls, you can add any Surface Controls into Scatter View, in statically or dynamically. For an example, here we are going to add a Surface Button into Scatter View Item template,

<s:ScatterView.ItemTemplate>
<DataTemplate>
<Grid>
<Image Source="{Binding}"/>
<s:SurfaceButton Click="OnItemClicked" Content="Click Me!" Width="100" Height="80"/>
Grid>
DataTemplate>
s:ScatterView.ItemTemplate>

And it is 100% same as normal WPF controls; you can handle any number of events which could occur from these controls.

private void OnItemClicked(object sender, RoutedEventArgs e)
{
// Get the button that was clicked and hide it.
Button b = (Button)e.Source as Button;
b.Visibility = Visibility.Collapsed;

// Get the ScatterViewItem control for the clicked button.
ScatterViewItem item = (ScatterViewItem)scatter.ContainerFromElement(b);

// Get the image within the ScatterViewItemcontrol.
System.Windows.Controls.ContentPresenter content = FindContentPresenter(item);
System.Windows.Controls.Image img =
(System.Windows.Controls.Image)content.ContentTemplate.FindName("img", content);

// Convert the image to grayscale.
img.Source = new FormatConvertedBitmap(
(BitmapSource)img.Source, PixelFormats.Gray16, BitmapPalettes.Gray16, 0);
}

System.Windows.Controls.ContentPresenter FindContentPresenter(DependencyObject obj)
{
for (int i = 0; i < VisualTreeHelper.GetChildrenCount(obj); i++)
{
DependencyObject child = VisualTreeHelper.GetChild(obj, i);
if (child != null && child is System.Windows.Controls.ContentPresenter)
{
return (System.Windows.Controls.ContentPresenter)child;
}
else
{
System.Windows.Controls.ContentPresenter childOfChild =
FindContentPresenter(child);
if (childOfChild != null)
return childOfChild;
}
}
return null;
}

Conclusion

Microsoft Surface is going to be a future technology and it is still maturing. So many features we will see in future than now. This series of articles to be continued with more Microsoft Surface Programming topics and next time it’s gonna be How We can Recognize Physical Objects with Microsoft Surface Programming.

Best Regards

Lakmal


Tuesday, August 2, 2011

Say "Hello World" with Microsoft Surface

We were waiting MS Surface SDK to release, for some time, after seen Microsoft Surface table for the first time. It's always great pleasure to make customer surprised with this sort of amazing technologies and now It's time to start leaning about developing Surface Applications. And hopefully it should not be a big deal of writing a Hello World Application with Surface SDK, as it is provided by Microsoft. We all know Microsoft is always working hard to make things comfortable for developersJ, though it makes us like sightless devotees to some extent.

Before start developments, you have to make sure following Software packages are installed on your computer,

  1. Visual Studio 2010 SP1
  2. Surface SDK 2.0

Here we go to say "Hello World" with Microsoft Surface,

Step 1 – Create Surface Project in VS 2010

If you have installed Surface SDK 2.0 in your machine, then you will find "surface" category under Visual C#, in new Project creation view in VS 2010. I named my Project as MySurfaceProject, it's up to you to make it as your preference. After the First Step, you will get Surface Project created in VS 2010 and in default, there will be a Surface Window is created for you by VS 2010 and its name is "SurfaceWondow1", if you don't like the name, you can change it, I will go with the same.

Step 2 – Add Scatter View into XAML

Step 3 – Add few Hello World Text Blocks into Scatter View

Simple make a Hello World Application with Microsoft Surface just tool three steps and now it's time to start testing it.

Yes we got it right, these Hello World boxes you can move around the screen with the mouse pointer, but in real customer environment, you will be able to do it with your finger tips J.


Lakmal Kankanamge


Next Generation of User Interactions - Microsoft Surface

User Interaction History

In Earlier days of computing, we used to work with command line Screens, where you need to have comprehensive knowledge about

the commands and not only that you have to keep them in mind exactly as they specified in the User guides. But later GUI was introduced and it brought User experience to a great level when it's compared to the earlier days. Now it's time to move from Graphical User Interfaces to Natural User Interfaces. It's about responding to User's natural reactions. Microsoft Surface and Kinet is all about providing capabilities to develop a

pplications for next generation, means develop Application with Natural User Interfaces.

Microsoft Surface

It's about experiencing 360 degree interfaces and with PixelSence, Microsoft Surface sees and responds to real world objects with more than 50 simultaneous inputs. This is been done with the new 40 inch Samsung SUR 40 for Microsoft Surface that can be used as a table, on the wall, embedded in fixture or furniture.

Microsoft Surface Home Page

What's this PixelSence is?

PixelSence allows a display to recognize fingers, hangs or any other objects placed on the screen, which provide vision based interaction without the use of cameras. This is been by each pixel, which sees what is been touched the screen a

nd pick it and transfer for processing.

It's like exactly what's happens in our eyes. Not what happens is Eye will pick all the images and transfer them into brain for recognizing and more processing.


How PixelSence works in detail,

  1. We touch the front Screen (Finger, Paper or any other object)
  2. IR backlight unit provides light through optical sheets, LCD and Protection glasses, and that hits the contacts, mean whatever touching the front screen
  3. Light reflected back from contact will be seen by the integrated sensors
  4. Sensors convert light signals into electrical signal/Value
  5. Values reported from all the sensors, will be used in formulating the real object placed on the screen
  6. The Picture is analyzed using image processing techniques
  7. The output is sent to PC, it includes the corrected sensor image and various contact types (fingers, blogs and tags)

What we can do with this as Software developers

It's about developing application which we can provide our customers to experience this amazing technology. Microsoft is providing a SDK called Microsoft Surface SDK and its first version was released bit time ago, and its latest release, Surface SDK 2.0 is available to download in the Microsoft web site. And you will find more developer and designer resources in Surface Design and Development site.

The new Surface SDK build upon,

  1. Embedded Windows 7 Professional 64 bit
  2. .NET Framework 4.0
  3. Windows Presentation Foundation 4.0
  4. Microsoft XNA Framework 4.0 – this is used in Game development on Microsoft XNA Game Studio 4.0.
  5. Windows PowerShell and DMTF DASH support, and enhanced administrator tools

Developer can do basic testing for their Surface Applications with Touch computers installed Windows 7 64 bit. Surface SDK will be replaced with Windows Surface Tool kit for Windows Touch beta later in this year, means everything will be delivered with Windows installations (Windows SDK most probably) later.

UI designers can design Surface app

lication with Microsoft Expression Blend 4 - http://msdn.microsoft.com/en-us/library/3a404b36-d8a4-4416-a4d4-1b9982596fe4#Blenderoo

Here you can find training for Surface developers - http://www.microsoft.com/surface/training20

/


Surface Architecture

This is the interesting part of the Surface, how it's look like Microsoft Surface Architecture.

This is the description of each layer,

Component

Description

Windows 7

Surface runs on the Windows 7 operating system. Windows 7 provides all the administrative, security, directory, and other Windows functionality (Bluetooth, WiFi, and so on) of the device made for Surface.

Developers and administrators who are working on a device made for Surface have full access to Windows functionality (inWindows mode). However, when users interact with Surface applications on a device made for Surface, the Windows user interface is completely suppressed (in Surface mode).

Hardware

The hardware of a device made for Surface includes a high definition, touch-sensitive display surface, and a computer that is running Windows 7. The hardware can capture physical points of touch, on or close to the screen, at 60 frames per second.

Vision System

The vision system software processes the video data that the hardware captures, and converts the raw video into data that you can access through Surface SDK APIs.

On devices made for Surface, a combination of a dedicated processor and touch-sensing technology sends data to your application through the Presentation layer and Core layer APIs.

Presentation and Core Layers

The Surface Software Development Kit (SDK) informs applications when touch points appear on the interactive surface device over the application window. As users touch the interactive surface and move around, the Surface SDK notifies applications so that applications can update their user interfaces.

For each touch point, applications can determine the position, orientation, bounding box, and central ellipse. For touch points that are made with tagged objects (which have tags printed on the bottom of the objects), applications can also determine the tag value.

The Surface SDK exposes two sets of APIs: the Presentation layer and the Core layer. You can use only one layer when you are developing a Surface application:

  • The Presentation layer integrates with Windows Presentation Foundation (WPF) and includes a suite of Surface-enabled controls.
  • You can use the Core layer with almost any user interface framework, including XNA 4.0.

For more information about the Presentation and Core layers, see Presentation Layer vs. Core Layer Applications.

Surface Shell

Surface Shell is the component that manages applications, windows, orientation, and user sessions; it also provides other functionality. Every Surface application must integrate with Surface Shell.

Surface and Windows Integration

The integration between Surface and the Windows operating system provides system-wide functionality on top of the Windows operating system. You must use this functionality to support unique aspects of the Surface experience, such as managing user sessions, switching between the Windows user interface (Windows mode) and the user experience (Surface mode), monitoring critical Surface processes, and handling critical failures.


Surface Overview - http://msdn.microsoft.com/en-us/library/ff727864.aspx

Windows Surface Blog - http://blogs.msdn.com/b/surface/

Applications - http://www.microsoft.com/surface/en/us/applicationpages.aspx

Forums - http://social.msdn.microsoft.com/Forums/en/surfaceappdevelopment/threads

There are number of videos you can enjoy from Microsoft

Experience things in new way - http://www.microsoft.com/surface/en/us/whatissurface.aspx

Power of PixelSence - http://www.microsoft.com/surface/en/us/pixelsense.aspx

Case Studies - http://www.microsoft.com/surface/en/us/casestudies.aspx

Lakmal Kankanamge

Sunday, July 24, 2011

Accounting Stuff...

Accounting is everywhere in the business these days, which you can't get rid of it anytime in the business. Took time time learn basics of Accounting, I'm not sure I'm on the right path to learn the stuff, but trying to start with searching on most necessary Terms..

General Ledger

A Company's Accounting Records. This formal ledger contains all the financial accounts records and statements of a business

The ledger uses two columns: one records debits, the other has offsetting credits.

Account Reconcilement

The process of confirming that two separate records of transactions in an account are equal. This can happen internally with a bank or broker, such as between general ledger entries and individual account records. Reconcilement also occurs when a customer of a bank or broker confirms that his or her personal records match what is reported on periodic statements. Ther term can also refer to balancing the books and records of a business with software programs and data entries.

Account reconcilement within financial institutions is a key regulatory and compliance function, and it is a primary focus for outside regulators in their routine audits of the firm. Customers of these firms should also keep an accurate record and report discrepancies promptly.

With the advent of computer systems to record transactions and client positions, reconciling often amounts to fixing small discrepancies of a few dollars, or even pennies, between one source and another. The longer an error goes uncovered, the more difficult it will be to reconcile the two records.

Account Receivable Subsidiary Ledger

An accounting ledger that shows the transaction and payment history separately for each customer to whom the business extends credit. The balance in each customer account is periodically reconciled with the accounts receivable balance in the general ledger, to ensure accuracy. The subsidiary ledger is also commonly referred to as the subledger or subaccount.

The usefulness of the accounts receivable subsidiary ledger lies in the fact that it can show, at a glance, the account status and amounts owed by a specific customer. For example, the general balance may show a total accounts receivable balance of $100,000, but it will not show which customer owes how much. This information can be gleaned from the accounts receivable subsidiary ledger.

Accounts Payable Subsidiary Ledger

An accounting ledger that shows the transaction history and amounts owed separately for each supplier from whom the business receives credit for purchases. The balance in the customer accounts is periodically reconciled with the accounts payable (AP) balance in the general ledger to ensure accuracy. The AP subsidiary ledger is also commonly referred to as the AP subledger or subaccount.

The utility of the accounts payable subsidiary ledger lies in the fact that it can show at a glance the amounts owed to a specific supplier. For example, the general balance may show a total accounts payable balance of $50,000, but it will not show which supplier is owed how much. This information can be gleaned from the accounts payable subsidiary ledger.

General Journal

The general journal is where double entry bookkeeping entries are recorded by debiting one or more accounts and crediting another one or more accounts with the same total amount. The total amount debited and the total amount credited should always be equal, thereby ensuring the accounting equation is maintained

A general journal entry includes:

1. The date of the transaction;

2. Titles of the accounts debited and credited (credited account is indented several spaces);

3. The amount of each debit and credit; and,

4. An explanation of the transaction also known as a Narration.

References

http://www.trizle.com/tips/28-general-ledger

http://www.investopedia.com/terms/g/generalledger.asp

http://www.middlecity.com/ch03.shtml

http://en.wikipedia.org/wiki/General_ledger

http://en.wikipedia.org/wiki/General_journal

http://en.wikipedia.org/wiki/Collection_agency

http://www.netmba.com/accounting/fin/process/ledger/

http://www.bookkeeping-financial-accounting-resources.com/sample-general-ledger-journal-entry.html

http://www.bookkeeping-financial-accounting-resources.com/sample-general-ledger-journal-entry.html

Wednesday, April 27, 2011

This week Articles

10 Ways to Improve Your Architecture - This article explains basic steps that you can follow to get things done successful as a Software Architect. It’s about modern practice.

What Is Enterprise Architecture – Discussion on Software System Enterprise Architecture.

Lakmal


Thursday, February 3, 2011

Test Automate for legacy Applications...

Automate testing is always a tedious Task, if you don’t have addicted to it. I’m also not that much into Test Automation, but with latest experience we had with our projects (Most importantly they are Products), were forced us to think of having Testing Automated. It was developers always doing Unit testing to make sure all the things are ok after a change, before giving a Release to the QA.

Found a good article (Or it’s about a discussion) on this specially it’s about Test Automate in legacy Applications already developed, but don have test automated.

There are Key Points highlighted in the content on this subject..

Hubert Matthews

“You can never test everything so you have to choose where you want to spend your Time and Money. Testing for me is primarily about information and risk and not about blanket coverage and completeness”.

Question mentioned, which might help to find areas to focus on..

1. Where is the Client Currently experiencing poorest quality?

2. What are the key areas of functioning (e.g what makes them money)?

3. Would the Client prefer more features better quality?

4. What are the risks of their systems?

5. If Client could improve what it would be?

6. Would exploratory manual testing find more important bugs?

And According to the Rajesh Patel..

1. Only automate through the GUI the most important paths through your app. A lot of apps have some common path that is used in 80% of cases. If this stops working, your business is in trouble!!

2. If you can bypass the GUI and go straight to the backend to test business functionality, do that. That means GUI-specific integration tests are about making sure the data from the front-end get to the back end.

Some more points..

  • Ask the customers to prioritize the critical areas of the app
  • Write manual regression test scripts for each area
  • Budget time in each sprint to write GUI smoke tests for those areas
  • Execute the test suite at least once a day with the CI framework
  • All new development should have adequate tests

Here is the Original Article link..

Best Regards

Lakmal

Thursday, December 9, 2010

Software System Scalability...

Scale out and Scale up is the requirements coming after you have run your system for a while in customer’s environment. The imagination of these concepts coming into the system architecting with the experience you got as a Programmer, Designer, and Architect. But having enough consideration up front will save your customer impression on you in a better place.

Recently we found same scenario to run through that one of our major product was struggling to deal with large scale data files, from both incoming and outgoing. In early days in customer environment, system was running in acceptable time duration in import and exports the data files with number of clients. By the time new clients were added to the system and the amount of the data to be deal with went high. System was struggling to response to this mass amount of data to be worked with.

Finally discussions ended up with to have a restructuring of the architecture of the system to deal this sort of bulky data files. Means we needed to have a door in the system API to deal with these large scale data files and directly push them into the system without transferring data through rushed network data channels.

And lots of Database retrieval and insertion scenarios were restructured to minimize unnecessary resource consuming and used some database data processing optimization techniques like indexing, remove few computed columns unnecessary.

Here are the things we came up with as point wise

1 1. Changes Made in API to accept list of entity data to accept large number of business entity data at once.

2 2. Minimized database connection open and close times. Always tried keep one connection opened to communicate with the database as possible. For an example huge number of data records are inserted to the data with one connection opened. There were some situations it was not possible to use one connection opened throughout all the process.

3 3. Data inserting and Data retrieval Optimization – introduce indexing for some Database Table fields. And removed few computing columns which are taking mass of times unnecessarily in data inserting and the retrievals.

Had lots of discussion in the mean time of process to restructure the system and everything has been ended up with unexpected performance gains. Now it’s looking great when its compared to the earlier version of the system.

Team effort brought system into a great level now.