Saturday, May 26, 2012

Roslyn – C#, VB Compilers as APIs


I started developing software in  C language for the first time in my life and then did use Java language especially in university times.  Java, I used to write in notepad earlier days and then compile and run the Program using the command line (“javac” for compile and “java” for run the compiled program code).

But Java also has IDEs like NetBeens, Eclipse, JBuilder and etc, but I quite used to write the Programs in Notepad and that made me so competent in Java those daysJ. After moving to Microsoft Technologies, life was so easy of using the Programming Languages and Visual Studio is been providing numerous support for the developers for past few years. And that’s a great thing and that will give lots of time think about Program logics instead wasting lots of time learning the Program languages.

Just think about, how Microsoft does this, these huge set of features in Visual Studio?

They have been investing lots of money for this and it’s matured a lot too. With Roslyn what Microsoft does is expose those implementations for outside developers as APIs and so then they can use themselves those features in their system implementations.

That’s a huge benefit, because we were struggling lot in making things so dynamic in some business scenarios and wanted generate, compile and run the code on the fly. Earlier we did this with Code Dom library which is also delivered by Microsoft, but this time it has more features than earlier. And the Project name is “Roslyn”. Enjoy it.
Roslyn Project White Paper
Roslyn Project Home
If you google on this subject, “Microsoft Roslyn Project”, you will find more resources.
Lakmal

Friday, May 25, 2012

GUIDs


Uniqueness, hmm, how we can achieve the uniqueness?, that something depends on the environment you work on. We can have various algorithms to achieve uniqueness in different environments, but if you think of achieving uniqueness in globally, it’s a bit complex story. But Eric Lippert explains the things in simple way…

GUID Part one
GUID part 2
GUID Part 3

Lakmal

Sunday, April 22, 2012

.NET Attributes


.NET attributes can be used in different perspectives in .NET Programming.
  1.     Manage object meta data
  2.   Handle Help information
  3.   And more
When it’s come to the implantation of the .NET attributes, we have to know three key things,
  1. How we can declare attributes
  2. How we can use declared attributes in our implementation
  3. How we can access them at run time
How we can declare the custom .NET attributes
.NET attribute itself is a class that we have to implement. While implementing an Attribute, we have to make sure we do two things,
  1. Inheriting our attribute class from that Attribute class which is exists under the “System” namespace.
  2. Specify which types of elements can use the attribute that we are going to implement. This we have to do with AttributeUsage attribute, which is coming with the .NET framework. 


Please find an example of attribute implemented,
using System;
[AttributeUsage(AttributeTargets.All)]
public class HelpAttribute : System.Attribute
{
   public readonly string Url;

   public string Topic               // Topic is a named parameter
   {
      get
      {
         return topic;
      }
      set
      {

        topic = value;
      }
   }

   public HelpAttribute(string url)  // url is a positional parameter
   {
      this.Url = url;
   }

   private string topic;
}

I’m not going to explain things in details of these implementation of this .NET custom Attributes and we know the basics and lets jump into the next step.
How we can use the declared Attributes
If you are a .NET programmer, surely you have used .NET attributes already, because we have lots of .NET attributes coming with .NET framework that we have to deal with day today programming works. Since we have already implemented an attribute called “HelpAttribute”, unknowingly (maybe) we have used an attribute, which is coming with .NET framework, called “AttributeUsage”.
Using Attributes is simple; Let’s use the custom attribute we declared, called “HelpAttribute”,
[HelpAttribute("http://localhost/MyClassInfo")]
class MyClass 
{
}

So we used the attribute and provided a value for its parameter called “url”.
Now it’s time to access the attribute that used in MyClass class.
How we can access the attributes
Accessing the attributes at runtime has to be done with .NET Reflection. Here is a sample code that is used to access the values of attribute “HelpAttribute”.
class MainClass 
{
   public static void Main() 
   {
      System.Reflection.MemberInfo info = typeof(MyClass);
      object[] attributes = info.GetCustomAttributes(true);
      for (int i = 0; i < attributes.Length; i ++)
      {
         System.Console.WriteLine(attributes[i]);
      }
   } 
} 

I didn’t need to go in detail, but just wanted to give an idea about the .NET attributes, which is a powerful feature coming with .NET framework.
Please go through this MSDN tutorial for more information, if you are interested to learn more.
Lakmal

Wednesday, February 8, 2012

What is Software Architecture?


 “Perfect is enemy of good enough”, that is one of the phrase I always trying to remember when I got things to finished on time. Finishing things perfectly will take unimaginable time, but make it good enough will take the time that has to take truly. This I wanted to remind at the start of this article, because of , this is 100% true concept for the Software Architecting too.  
Knowing the basics will always put you on behind the safe margin always. Before going to look at what we can do with the “Software Architecture”, let’s see what the actual mean of it is,

Software application architecture is the process of defining a structured solution that meets all of the technical and operational requirements, while optimizing common quality attributes such as performance, security, and manageability. It involves a series of decisions based on a wide range of factors, and each of these decisions can have considerable impact on the quality, performance, maintainability, and overall success of the application.

This definition is not a one that I wrote myself, but I copied it from Microsoft web site, where you can find lots of resources on software architecture. There are lots of definitions that have been published by different peoples and organizations, for the Software Architecture. You can take time to Google and see more definitions.

Why is architecture important?
Like any other structure, Software also needs to have architecture itself to make sure few key requirements,

    ·         How will the users be using the application?
    ·         How will the application be deployed into production and managed?
    ·         What are the quality attribute requirements for the application, such as security, performance, concurrency, internationalization, and configuration?
    ·         How can the application be designed to be flexible and maintainable over time?
    ·         What are the architectural trends that might impact your application now or after it has been deployed?


The Goal of Architecture
What Architecture is trying do is, build a bridge between business requirements and technical requirements by understanding the Use Scenarios (Use Cases or User stories). In generally Architecture should,
·         Expose the structure of the system but hide the implementation details.
·         Realize all of the use cases and scenarios.
·         Try to address the requirements of various stakeholders.
·         Handle both functional and quality requirements.

The Architecture Landscape
It is always better to keep in touch with the architectural trends that shape the Software Architecture today.  There are key forces that demands to change this area of Software development,
 1.       Users and Business demands for faster results
 2.       Better support for varying work styles and workflows
 3.       Improved adaptability of software design


These are few of  key trends in Software Architecting,
 1.       User Empowerment
 2.       Market Maturity
 3.       Flexible design
       4.       Future Trends

The Principle of Architecture Design
Architecting and Designing the things upfront is almost impossible. Things are getting improved stage by stage as you learn more. These are the question that we have to consider while we create an Architecture Design,
·         What are the foundational parts of the architecture that represent the greatest risk if you get them wrong?
·         What are the parts of the architecture that are most likely to change, or whose design you can delay until later with little impact?
·         What are your key assumptions, and how will you test them?
·         What conditions may require you to refactor the design?
Always we have to keep options open for future changes.

Key Architecture Principles
These are the few of key architecture principles which I found,
·         Build to change instead of building to last. Consider how the application may need to change over time to address new requirements and challenges, and build in the flexibility to support this.
·         Model to analyze and reduce risk. Use design tools, modeling systems such as Unified Modeling Language (UML), and visualizations where appropriate to help you capture requirements and architectural and design decisions, and to analyze their impact. However, do not formalize the model to the extent that it suppresses the capability to iterate and adapt the design easily.
·         Use models and visualizations as a communication and collaboration tool. Efficient communication of the design, the decisions you make, and ongoing changes to the design, is critical to good architecture. Use models, views, and other visualizations of the architecture to communicate and share your design efficiently with all the stakeholders, and to enable rapid communication of changes to the design.
·         Identify key engineering decisions. Use the information in this guide to understand the key engineering decisions and the areas where mistakes are most often made. Invest in getting these key decisions right the first time so that the design is more flexible and less likely to be broken by changes.
It’s is always need to use incremental and iterative approach to refine the architecture.

Testing the Architecture
We can consider answering following questions while we are testing the architecture,
·         What assumptions have I made in this architecture?
·         What explicit or implied requirements is this architecture meeting?
·         What are the key risks with this architectural approach?
·         What countermeasures are in place to mitigate key risks?
·         In what ways is this architecture an improvement over the baseline or the last candidate architecture?

Conclusion
This is just an overview of what Software Architecture is. This is not complete coverage of the topic, but I wanted to remember and write things that I leaned from few sources. Most of time it’s Microsoft web site.  Hope to continue this discussion further with few key topics of Software Architecture.

Regards

Lakmal

Saturday, December 10, 2011

This week readings..


No SQL databases
Interesting point, as James Philip mentioning, high percentage of real word Software Application scenarios are document-centric by nature. This concept does not talks about the data normalization, tables, joining or data redundancy, but document oriented data model, concentrate on storing very large amount of information, then analyze the information to learn something.

WebOS 3.0 is based on Enyo, a new HTML framework
HP is targeting a Web base OS for mobile devices, which is based on HTML framework called “Enyo”. And they have release WebOS SDK and PDK and that’s a good new for developer..
And finally WebOS 3.0, announced open source.

Binding Enhancements in WPF 4.5
It’s cutting edge Binding features from WPF latest..
1.       Support Binding static properties via class name
2.       Delay Binding

I’m a big fan of Eric Lippert and he is Microsoft Employee and most importantly fantastic writer. This weekend I went through his blog and found few interesting posts,
Why IL
This is about Microsoft intermediate language - http://blogs.msdn.com/b/ericlippert/archive/2011/11/18/why-il.aspx

The Roslyn preview is now available – Compiler as a Service (CAAS)
When we needed to access the MS code compiling and code analysis capabilities, we used to use Microsoft CodeDom in our applications. But this Roslyn framework, MS is trying to provide these capabilities as a API, where anyone can use those capabilities easily. Microsoft Visual Studio development team will also follow the same and will use this as a base platform for code analysis and compiling.


 Lakmal

Sunday, December 4, 2011

This week readings..


Linked Data – Connect Distributed Data across the Web - http://linkeddata.org/home
It’s about how to use, publish,etc Linked Data across the web and more..
First time I got to know about this and look very interesting.
Handling Dates with Java – Date4J – A Minimalistic Library for handling dates - http://www.infoq.com/news/2011/12/date4j-vs-joda-time
First time I felt great while reading this because I had to change my gear to the .NET platform at the initial part of my carrier. With the amount of functionalities available in .NET languages to handle date and time, you will feel great as a .NET developer.  It’s almost painless..

Lakmal

Tuesday, November 15, 2011

Software System Usability....


Usability is a never ending topic in modern day software application developments. Usability implementation is starting from the initial phase of the development of a software project and will be continued until giving the final release to the customer. Means it’s a never ending process, all what we need, is to prepare for thatJ...
This article I found so much interested and it has been touched the key aspects of Software System Usability implementation process…

Sunday, August 28, 2011

XAML Magic - Few of the Basic Features..

The basic idea of XAML is to make UI design more generic and provide environment to work both developers and UI designers separately. Finally it’s ended up in XML structure, where everyone can understand the stuff very easily.

Just let me list down few of the main features that are coming with XAML,

1. Whatever you do in XAML, you can do the same with code as well

It’s like this, Here is the XAML Code,


Same thing you can do with the code too,

   
In XAML, Elements/Tags are representing the classes and the XML tag attributes are representing the class properties. This you alreay have seen in above XAML code and as an example,
"Margin="20">Welcome to the World of XAML"
Margin is a property of TextBlock class and that you can see as attribute of  tag. 
2.       Represent Properties as Elements
This is one of the interesting feature that you can find in XAML and it is looks like this,
Normally what you do is that you specify the content of the button directly as a text, but here you can take button content as anything that you can imagine as a UI control. In example it is a Image, but you can something different.
3.       Implicit Type Conversion 
This is about converting the types at runtime and for an example,


Border is the class that has property, which accepts “System.Windows.Media.Brushes.Blue” object as its value. In addition to that BorderThicknss also a property and which is accepting the Thickness Object as its value. 
4.       Markup Extensions 
This is about .NET attributes and where you can place them in XAML structure.  There are number of built in Markup extensions and in addition to that you can develop custom markup extensions by your own. 
These are the built in markup extensions you can find in .NET,
  • Binding
    To bind the values of two properties together.
  • StaticResource
    One time lookup of a resource entry
  • DynamicResource
    Auto updating lookup of a resource entry
  • TemplateBinding
    To bind a property of a control template to a dependency property of the control
  • x:Static
    Resolve the value of a static property.
  • x:Null
    Return
    null

Example,


5. Finally, Namespaces

Normally namespaces we used to find in .cs or .vb files in .NET (in most if the times), but this time you will have to invoke them in XAML, because, in XAML you are dealing with the objects, which are already defined for you some where by Microsoft or you or any other.

To invoke a relevant class tag in a XAML, you have to import them first into XAML document. In default you will get imported basic namespaces, into you XAML document by Visual Studio, when you working with it. Basic namespaces you will find in WPF applciations,

http://schemas.microsoft.com/winfx/2006/xaml/presentation - It is mapped to all wpf controls inSystem.Windows.Controls.

http://schemas.microsoft.com/winfx/2006/xaml - it is mapped to System.Windows.Markup that defines the XAML keywords.

Here is how it’s look like in XAML,

If you any custom controls developed in an Assembly called “Project.CustomControls”, here is the how we can import it into XAML document,

xmlns=”http://schemas.microsoft.com/winfx/2006/xaml/presentation”
        xmlns:x=”http://schemas.microsoft.com/winfx/2006/xaml”
        xmlns:myCustomControls ="clr-namespace:Project.CustomControls">
Cheers
Lakmal Kankanamge 

XAML Magic - Building Applications with XAML Toyes

Karl Shifflett,one of the best techi on XAML and WPF stuff has managed to introduce new toolkit, which is providing capabilities to create UI forms directly from classes that you have written already. Simply it looks amazing, because without writing any line of code, on purpose making the UI Logic, you can make a make form and have all the data bind to it.

Karl call this as XAML Power Toyes, that you can download and find more information about it from his blog.

This is the videos I found this stuff first..

http://channel9.msdn.com/shows/Continuum/XAMLPowerToys/

Lakmal Kankanamage

XAML Magic..

I wanted to open a topic like this because of the beauty I found in XAML technology. In early days I was struggling to find out how we can work with XAML, since it was fresh experience for .NET developers.

XAML is about coming UI into XML structure. XAML is totally based on the XML concepts and it is about make things more generic at the level of the UI designing.

Channel 9 has bunch of videos, specially about XAML, it's architecture, features and etc.. Out of them I found this video is so much useful in understanding the concept behind the XAML technology ...


This is just a start of discussion about XAML technology and there will more post coming on this in future...

Lakmal Kankanamge


Saturday, August 20, 2011

Microsoft Surface Programming – Object Recognition

Microsoft Surface Technology is supporting recognizing physical objects through the surface and reacting according to the object placed on the surface. I was so curios to know about the concept behind this object recognizing with this Microsoft Surface enable applications.

With the things I leaned from Colombo Code Camp and after having searched on the internet, found few important key points attached with technology. First thing is, MS Surface is recognizing object as a Tag, which has a unique value, which is retrieved from Surface’s Vision system. Means for MS Surface Vision System, physical object is always a Tag, which always has to be pasted on the object, as surface can identify it properly.

Tags are looks like this,

Tag always has value and each value is having different dot structured as showed in the picture. After having this tag printed in a piece paper, you have to paste it on the object that you are going to place on the Surface table (or any other device which is supporting MS Surface Technology). Then that object has the value that the pasted tag has, in the surface application.

Then the next curious point is that how we can generate these tags for Surface Applications. Answer is, we have two ways obtaining these tags,

  1. Generate Tag with Tag Printing Tool
  2. 2. Tags from Microsoft.

Please refer this link for more information - http://msdn.microsoft.com/en-us/library/ee804762(v=surface.10).aspx

Once you have the tag, you can paste it on any object, then that object should be identified by a MS Surface application by the Tag which is pasted on it.

Input Visualizer and Input Simulator

There is a tool which has been delivered with Windows 7 called “Input Visualizer” and this tool can be used to show some information about the tags (objects) which are placed on surface applications. To open it - All Programs | Microsoft Surface 2.0 SDK | Tools | Input Visualizer.

And for this we need to open one more tool, Input Simulator, which I explained in my previous post in MS Surface Scatter View.

Input Visualizer

Input Simulator

How we can identify the Tags programmatically

Just start get things going, open Visual Studio 2010 and create a MS Surface Project called “MyObjectRecognizionApp”,

Without writing any line of codes, you can start place objects on surface application and see how their tag information is looks like,

Just click on the middle box of second row of tools in Input Simulator, then click upon the application surface, then you will see this kind of picture in your screen. All this you have to do because of we are testing these surface application features with our monitors which are not supporting the touch. If you seriously check the value in the detail view, you will find it like, 0x0000000000000100 and double check it with the values that I have mentioned in Tag Value field in Input Simulator.

This is how you can test surface application for object recognition with the Input Simulator, provided with Windows 7 Operating System. Before clicking on the Surface application, you can mention tag values (Tag Series and Tag Value) and those values you can use in your app code for responds for virtual objects that you test with input simulator.

So our next step is to recognize an object (In our case it is virtual object which we make with input simulator) place on the surface application and do something to respond for it. For this we need to know about two most important XAML Elements,

1. TagVisualizer – This will display the information about the tag when it is placed in the Surface. The TagVisualizer works with a known set of tags. This known set is defined in the TagVisualizer.Definitions collection.

2. TagVisualization – This is the control type which holds all the content, after particular object is placed on the surface application.

Here what I’m going to show is, I will have two virtual objects which will have tag values 100 and 200 respectively. Once first object is place on the Surface Application, system will show “My Tag1” text and for the second object it will show “My Tag 2” text.

In my project I have default window created, named “SurfaceWindow1.xaml” and I will go with it without create any new windows. This is how it’s look like SurfaceWindow1 XAML code,

<s:TagVisualizer x:Name="TagVisualizer1">

<s:TagVisualizer.Definitions>

<s:TagVisualizationDefinition

Series="0"

Value="100"

Source="MyTag1Visualization.xaml"

LostTagTimeout="2000"

OrientationOffsetFromTag="0"

PhysicalCenterOffsetFromTag="0,-1.5"

UsesTagOrientation="True"

TagRemovedBehavior="Fade" />

<s:TagVisualizationDefinition

Series="0"

Value="200"

Source="MyTag2Visualization.xaml"

LostTagTimeout="2000"

OrientationOffsetFromTag="0"

PhysicalCenterOffsetFromTag="0,-1.5"

UsesTagOrientation="True"

TagRemovedBehavior="Fade" />

s:TagVisualizer.Definitions>

s:TagVisualizer>

Grid>

And I have two Tag Visualizations created,

MyTag1Visualization.xaml

<s:TagVisualization x:Class="MySurfaceObjectRecognizionApp.MyTag2Visualization"

xmlns="http://schemas.microsoft.com/winfx/2006/xaml/presentation"

xmlns:x="http://schemas.microsoft.com/winfx/2006/xaml"

xmlns:s="http://schemas.microsoft.com/surface/2008"

Loaded="MyTag2Visualization_Loaded">

<Grid>

<TextBlock Margin="31,62,0,0" FontSize="20" Height="26" Width="206">My Tag 1TextBlock>

Grid>

s:TagVisualization>

MyTag2Visualization.xaml

<s:TagVisualization x:Class="MySurfaceObjectRecognizionApp.MyTag2Visualization"

xmlns="http://schemas.microsoft.com/winfx/2006/xaml/presentation"

xmlns:x="http://schemas.microsoft.com/winfx/2006/xaml"

xmlns:s="http://schemas.microsoft.com/surface/2008"

Loaded="MyTag2Visualization_Loaded">

<Grid>

<TextBlock Margin="12,53,0,0" FontSize="20" Height="26" Width="206">My Tag 2TextBlock>

Grid>

s:TagVisualization>

Now it’s time to run the application and see how output is look like,

By clicking left and right mouse buttons at once, you can place objects permanently in the surface, otherwise once you release the mouse button, the virtual object will disappear. This tip is only for testing Surface applications with Input Simulator, but with real MS Surface supported devices, you don’t need to worry about this and can place objects as you expected. In real, what exactly happens is, once you put an object with pasted tag value, relevant tag visualization control content will appear on the surface, as response to the object identification.

To get this done, I didn’t write any line of code, but all the time it’s XMAL elements. You can use coding to make things smarter and useful in real application developments for MS Surface devices.

Lakmal Kankanamge.

Saturday, August 6, 2011

Unistroke Recognition in JavaScript

Recognizing shapes is one of the resource consuming works on earlier days and you need to have so complex algorithms to recognize the patterns and then identify the shape. Java Script is not having such big set of functionalities with its API, but this is a Shape Recognition Application written in Java Script.

http://depts.washington.edu/aimgroup/proj/dollar/

Microsoft Surface ScatterView

Scatter View is one of the most important controls of which Microsoft Surface SDK is providing and it enables features like multi usable, multi touchable, moving components here and there, stacking items, resizing, scaling and so on.
Throughout the discussion, we will cover,
1. How we can use Scatter View
2. Change Scatter View Properties
3. Adding Items to Scatter View Programmatically
4. Add Interactive Elements to Scatter View
5. Conclusion
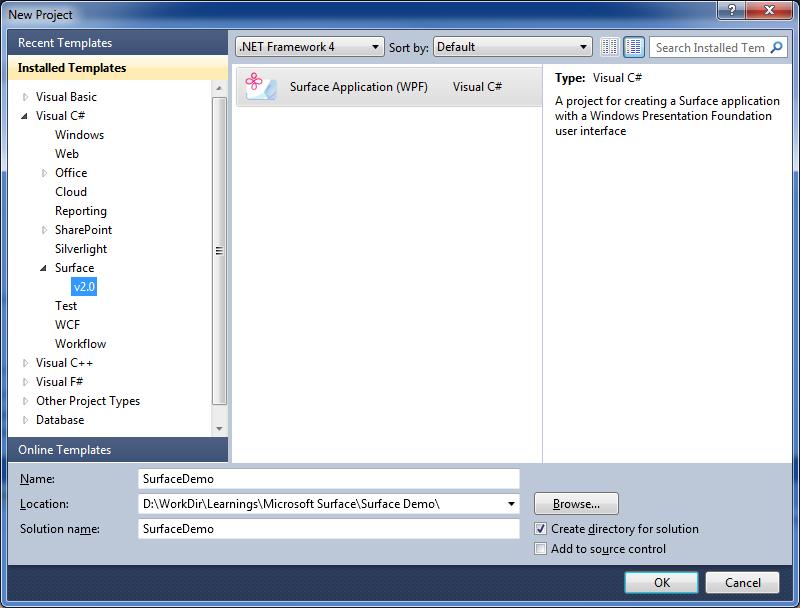
Just start to get things going; let’s create a Microsoft Project in Visual Studio 2010,
Press OK and then we will get a Project created in VS 2010 named, SurfaceDemo, which is having a Surface Window named “SurfaceWindow1”. This is the XAML we got in SurfaceWindow1.XAML page,
<s:SurfaceWindow x:Class="SurfaceDemo.SurfaceWindow1"
xmlns="http://schemas.microsoft.com/winfx/2006/xaml/presentation"
xmlns:x="http://schemas.microsoft.com/winfx/2006/xaml"
xmlns:s="http://schemas.microsoft.com/surface/2008"
Title="SurfaceDemo"
>
<Grid>

Grid>
s:SurfaceWindow>

Then I will go and add a Sactter View into the Grid inside the grid,
<s:SurfaceWindow x:Class="SurfaceDemo.SurfaceWindow1"
xmlns="http://schemas.microsoft.com/winfx/2006/xaml/presentation"
xmlns:x="http://schemas.microsoft.com/winfx/2006/xaml"
xmlns:s="http://schemas.microsoft.com/surface/2008"
Title="SurfaceDemo"
>
<Grid>
<s:ScatterView Name="MyScatterView">

s:ScatterView>
Grid>
s:SurfaceWindow>

How we can User the Scatter View

No we can start adding Controls into Scatter View. You can add any of Surface Control into this Scatter view and it will give those controls to the behaviors that I mentioned earlier. Let’s start the with an Image, that the perfect example we show most of the features of Scatter View. Instead of one image we will add the set of images from one of my image folders, and we are going to add the images at the run time too.
Here is the Scatter XAML code we need for our purpose, means how it’s look like the Scatter View SurfaceWindow1.xaml file,
<s:ScatterView Name="MyScatterView">
<s:ScatterView.ItemTemplate>
<DataTemplate >
<Image Source="{Binding}"/>
DataTemplate>
s:ScatterView.ItemTemplate>
s:ScatterView>

Then in the code behind file, we have to bind the list of image into Scatter View to show them in the window,
public SurfaceWindow1()
{
InitializeComponent();

// Add handlers for window availability events
AddWindowAvailabilityHandlers();

//Add Images into Sctter View
MyScatterView. ItemsSource = System.IO.Directory.GetFiles(@"D:\WorkDir\Learnings\Microsoft Surface\Photos", "*.jpg");
}

Here what we are doing is that, just adding my mages list into scatter view item source,

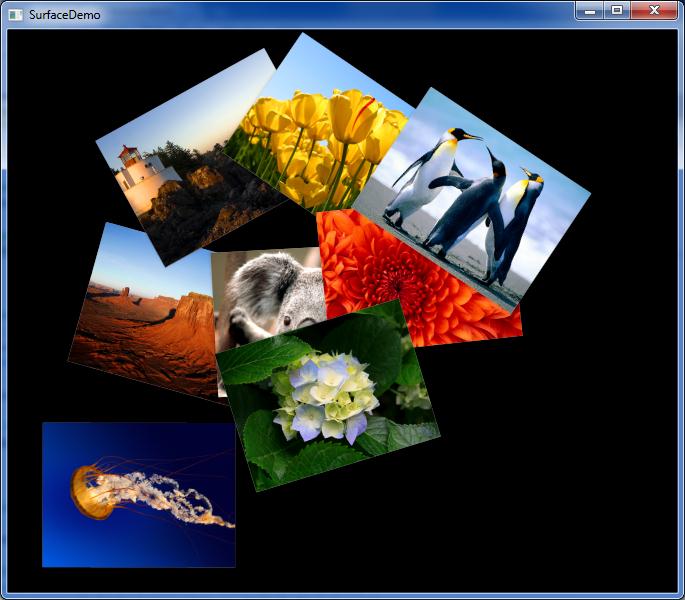
Here is how output is looks like after hitting F5,


Now you can start playing with these images by using your mouse. You should be able to drag them here and there and change the angle the way you need and etc. But to test multi User and Multi Touch capabilities, you need to use the Windows 7 Input Simulator.

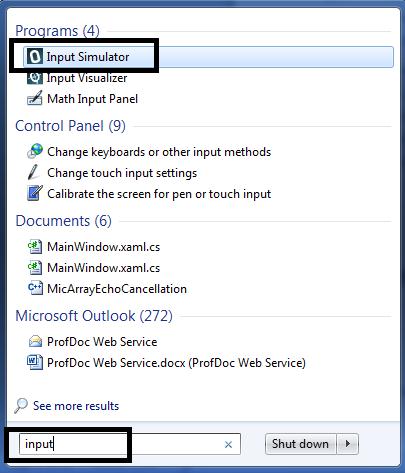
To Start the Input Simulator, just type input in “Run” command box, at the bottom of Windows Start Menu, then you will see the Input Simulator and just click on it.


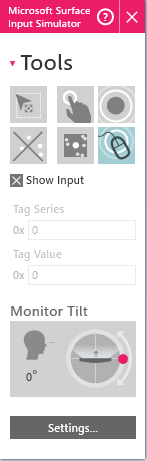
Input Simulator


Just Click on the finger box in command window, then you will get your mouse pointer, which is most like a vertical rectangle, which is having curved edges. First Just click images with it, then you will see the reflections from the images. To play with the image, first click Left mouse button and while it is pressed, just click the right mouse button too, then you will get a fix clicked, like pined point in picture.

Then just go to other corner of the image, click left mouse button and while it is pressed start to move mouse around the window. Now you will find your ways to play with images. With this you should be able to Scale and Rotate the images easily with your mouse.

Change Scatter View Properties

When it’s come to changing properties of Scatter View items, you can,

1. Constraining Manipulations
2. Limiting manipulations
3. Setting Explicit Positions

You can constrain Scatter View Item manipulations by setting,

1. MaxHeight – this is the maximum height of items
2. MaxWidth – this the maximum width of the items
3. MinHeight - minimum height of the items
4. MinWidth – minimum with of the items
5. CanScale – true means can scale items, false means can’t scale items
6. CanRotate - true means can rotate items, false means can’t rotate items
7. CanMove - true means can move items, false means can’t move items

<s:ScatterView Name="MyScatterView">
<s:ScatterViewItem MaxHeight="100" MaxWidth="100" MinHeight="50" MinWidth="50"
CanScale="True" CanRotate="True" CanMove="False">
<Image Source="D:\WorkDir\Learnings\Microsoft Surface\Photos\Koala.jpg" />
s:ScatterViewItem>
s:ScatterView>

There are many numbers of properties; you can change in Scatter view and Scatter view items to make things more usable for your customers. Here I just mentioned few key properties only.

This is a sample Scatter View,

<s:ScatterView Name="MyScatterView">
<s:ScatterViewItem Center="512,384" BorderBrush="Brown" BorderThickness="3">
<Image Source="D:\WorkDir\Learnings\Microsoft Surface\Photos\Desert.jpg"/>
s:ScatterViewItem>
<s:ScatterViewItem Center="512,384" BorderBrush="Brown" BorderThickness="3">
<Image Source="D:\WorkDir\Learnings\Microsoft Surface\Photos\Desert.jpg"/>
s:ScatterViewItem>
<s:ScatterViewItem Center="512,384" BorderBrush="Brown" BorderThickness="3">
<Image Source="D:\WorkDir\Learnings\Microsoft Surface\Photos\Desert.jpg"/>
s:ScatterViewItem>
<s:ScatterViewItem Center="512,384" BorderBrush="Brown" BorderThickness="3">
<Image Source="D:\WorkDir\Learnings\Microsoft Surface\Photos\Desert.jpg"/>
s:ScatterViewItem>
<s:ScatterViewItem Center="512,384" BorderBrush="Brown" BorderThickness="3">
<Image Source="D:\WorkDir\Learnings\Microsoft Surface\Photos\Desert.jpg"/>
s:ScatterViewItem>

<s:ScatterViewItem Center="512,384" BorderBrush="Brown" BorderThickness="3">
<Image Source="D:\WorkDir\Learnings\Microsoft Surface\Photos\Desert.jpg"/>
s:ScatterViewItem>
s:ScatterView>

And output is like this,
You can use ItemContainerStyle property to change the properties of Scatter View Container Items,

<s:ScatterView>
<s:ScatterView.ItemContainerStyle>
<Style TargetType="{x:Type s:ScatterViewItem}">
<Setter Property="Center" Value="512,384"/>
<Setter Property="BorderBrush" Value="White"/>
<Setter Property="BorderThickness" Value="3"/>
Style>
s:ScatterView.ItemContainerStyle>
<Image Source="Desert.jpg"/>

<Image Source="Desert.jpg"/>
s:ScatterView>

Add Items to Scatter View Programmatically

Instead of doing things with Scatter View in XAML, developers can do the same, more dynamically by programming. You have access to all the properties of Scatter View, in programmatically, as you do in XAML, in statically. Whatever you do in XAML will reflect in output in static way, but whenever you need things to be more dynamic, then the option is obvious, you have to do it in programmatically.

For an Example you can take photo application I created at the first phase of the article, there we take the images from folder and populate them in Scatter View, as Scatter View Items, dynamically.

XAML
<s:ScatterView Name="MyScatterView">
<s:ScatterView.ItemTemplate>
<DataTemplate >
<Image Source="{Binding}"/>
DataTemplate>
s:ScatterView.ItemTemplate>
s:ScatterView>

public SurfaceWindow1()
{
InitializeComponent();

// Add handlers for window availability events
AddWindowAvailabilityHandlers();

//Add Images into Sctter View
MyScatterView. ItemsSource = System.IO.Directory.GetFiles(@"D:\WorkDir\Learnings\Microsoft Surface\Photos", "*.jpg");
}


Add Interactive Items to Scatter View

As WPF Panels, Grids and any other container controls, you can add any Surface Controls into Scatter View, in statically or dynamically. For an example, here we are going to add a Surface Button into Scatter View Item template,

<s:ScatterView.ItemTemplate>
<DataTemplate>
<Grid>
<Image Source="{Binding}"/>
<s:SurfaceButton Click="OnItemClicked" Content="Click Me!" Width="100" Height="80"/>
Grid>
DataTemplate>
s:ScatterView.ItemTemplate>

And it is 100% same as normal WPF controls; you can handle any number of events which could occur from these controls.

private void OnItemClicked(object sender, RoutedEventArgs e)
{
// Get the button that was clicked and hide it.
Button b = (Button)e.Source as Button;
b.Visibility = Visibility.Collapsed;

// Get the ScatterViewItem control for the clicked button.
ScatterViewItem item = (ScatterViewItem)scatter.ContainerFromElement(b);

// Get the image within the ScatterViewItemcontrol.
System.Windows.Controls.ContentPresenter content = FindContentPresenter(item);
System.Windows.Controls.Image img =
(System.Windows.Controls.Image)content.ContentTemplate.FindName("img", content);

// Convert the image to grayscale.
img.Source = new FormatConvertedBitmap(
(BitmapSource)img.Source, PixelFormats.Gray16, BitmapPalettes.Gray16, 0);
}

System.Windows.Controls.ContentPresenter FindContentPresenter(DependencyObject obj)
{
for (int i = 0; i < VisualTreeHelper.GetChildrenCount(obj); i++)
{
DependencyObject child = VisualTreeHelper.GetChild(obj, i);
if (child != null && child is System.Windows.Controls.ContentPresenter)
{
return (System.Windows.Controls.ContentPresenter)child;
}
else
{
System.Windows.Controls.ContentPresenter childOfChild =
FindContentPresenter(child);
if (childOfChild != null)
return childOfChild;
}
}
return null;
}

Conclusion

Microsoft Surface is going to be a future technology and it is still maturing. So many features we will see in future than now. This series of articles to be continued with more Microsoft Surface Programming topics and next time it’s gonna be How We can Recognize Physical Objects with Microsoft Surface Programming.

Best Regards

Lakmal